.NET2008. 5. 15. 14:23

--- C# 언어는 왜 만들어졌나요? ---

 윈도우 95 초기 버전이 출시된 1995년 윈도우에는 인터넷 기능이 포함되어 있지 않았습니다. 그 때만 해도 마이크로소프트(이하 MS)는 인터넷의 잠재성을 깨닫지 못하고 있었습니다. 얼마 후 인터넷의 폭발적인 성장과 더불어 넷스케이프 웹브라우저, 자바 애플릿, 자바 스크립트 등의 인터넷 관련 기술이 등장해 시장을 급속하게 넓혀갈 때 MS는 부랴부랴 익스플로러와 비주얼 베이직을 변형한 비주얼 베이직 스크립트를 개발했습니다.

 당시 인터넷 관련된 핵심 이슈는 자바라는 네트워크 언어였습니다. 인터넷 개발에 늦게 발을 들여 놓은 MS는 선마이크로시스템즈(이하 SUN)가 개발한 자바를 임의로 변형해 익스플로러에 탑재했습니다. 또한 윈도우 개발 환경인 비주얼 스튜디오에도 자바 기술을 포함시켰습니다. 자바의 폭발적인 인기에도 불구하고 당시에는 변변한 자바 개발 툴이 없었는데 MS에서 비주얼 J++라는 강력한 자바 개발툴을 개발해 시장에 무료로 공급하기 시작했습니다. 실제 자바를 개발한 SUN은 MS의 이러한 자바 개발 정책을 지켜보고 자바 언어의 기득권을 빼앗길 수 있다는 위기의식을 느끼게 되었고, 곧 법정 소송을 진행해 더 이상 MS가 자바를 변형해 사용할 수 없다록 제동을 걸었습니다. 이후 MS는 자바 관련 프로그램을 개발할 수 없게 되었습니다. 특히 자바 개발 툴인 비주얼 J++는 프로그램 관련 책자까지 모두 회수하라는 법원의 판결이 떨어졌습니다.

 아이러니하게도 자바를 오늘날 가장 많이 사용하는 네트워크 언어로 만든 주역인 MS는 더 이상 자바 관련 기술을 사용할 수 없게 된 것입니다. 하지만 이미 시대의 대세는 인터넷을 기반으로 하는 분산 네트워크 기술로 옮겨가고 있었습니다. 특히 그 핵심 기술로 자바가 확고한 위치를 차지하고 있었으며 IBM, 오라클, BEA 등 대형 IT업체에서 자바를 중심으로 이러한 분산 네트워크 기술을 구현하기 시작했습니다. 이러한 상황을 타개하기 위해 MS에서 발표한 기술이 바로 .NET(이하 닷넷)입니다.

 닷넷을 짧게 요약하면, "애플리케이션, 서비스가 유기적으로 통합되기 위한 MS의 제품군과 기술 환경 및 서비스"라고 말할 수 있습니다. 즉, 자바 기술에 대응하기 위한 MS의 새로운 차세대 인터넷 환경이 바로 닷넷입니다. 닷넷은 자바가 제공하는 라이브러리인 JDK와 비슷한 라이브러리의 집합이며, 이 라이브러리를 가장 효율적으로 사용해 개발할 수 있는 언어로 C#언어를 새롭게 만들어 발표했습니다. C#은 MS의 자바 대응 전략의 핵심언어입니다. C#은 자바와 비슷한 용도로 사용되며 MS의 핵심 언어인 비주얼 베이직의 생산성과 비주얼 C++의 성능을 결합한 새로운 차세대 주력 언어입니다.

--- C#의 장점 ---

 C#은 네트워크 환경에서 개발자의 생산성을 증대시키고 프로그래머가 작성해야 하는 코드의 양을 줄이는 기술이 포함되어 있습니다.

<분산 환경에 적합한 언어>

 ASP.NET, XML.NET, 모바일 프로그램을 빠른 시간안에 개발할 수 있습니다. 특히 ASP.NET은 웹 관련 프로그램 개발에 뛰어난 생산성과 성능을 발휘합니다.

<구조 중립적>

 C#을 이용해 개발된 프로그램을 다양한 환경의 운영체제에서 실행할 수 있습니다.

<뛰어난 생산성>

 C#은 비주얼 스튜디오 닷넷을 이용해 뛰어난 생산성을 제공합니다. 비주얼 베이직의 생산성과 비주얼 C++의 성능을 동시에 제공하는 C#은 개발 시간을 크게 단축시켜 줍니다.

<강력한 디버깅 기능>

 ASP.NET, 모바일 프로그래밍 등 기존 언어에서 디버깅 제공이 곤란했던 분야에 대해 뛰어난 디버깅 기능을 제공합니다.

--- C#의 작동원리 ---

 C#언어도 자바와 마찬가지로 컴파일 방식과 인터프리터 방식이 혼합된 하이브리드 방식을 사용합니다. 확장자가 csc로 끝나는 소스코드를 작성하고 csc.exe 컴파일러를 이용해 중간 코드를 생성합니다. C#의 중간코드는 확장자가 EXE, DLL로 되어 있습니다. 그러나 C/C++등의 컴파일 언어가 생성한 EXE, DLL과는 다릅니다. C#의 중간코드는 닷넷 프레임워크가 설치된 환경에서만 작동하며, 닷넷 프레임워크가 설치되어 있지 않은 환경에서는 실행 파일이 동작하지 않습니다. C#은 현재 윈도우, 리눅스, 유닉스에서 사용가능한 해석기가 만들어져 있습니다.

 소스코드를 컴파일해 생성된 중간 코드는 CLR을 이용해 실행 파일로 변환되어 작동합니다. CLR은 자바의 JVM과 동일한 원리로 만들어졌습니다. 윈도우 비스타 버전부터는 운영체제 안에 닷넷 프레임워크가 설치되어 있기 때문에 별도의 CLR을 설치할 필요가 없지만 나머지 버전 윈도우에서는 반드시 닷넷 프레임워크를 설치해야만 실행할 수 있습니다. 중간코드를 클래스 로더가 읽어들여 JIT 컴파일러를 이용해 실행이 가능한 기계어 코드를 생성합니다. .NET Compact 프레임워크를 이용하면 윈도우 CE 운영체제를 사용하는 휴대폰, PDA에서도 실행되는 닷넷 프로그램을 작성할 수 있습니다.

출처 : 책 >> C# Programming Bible with .Net framework 3.0
-------------------------------------------------------
출처 : 네이뇬 지식인

닷넷 안깔려 있으믄 쒸샵으로 개발한거 못쓴다는 소리것지.
Posted by miing
.NET2007. 12. 20. 16:10

aspnet_regiis


.NET 프레임워크를 설치할 때,
IIS가 설치된 상태에서 설치를 해야 한다.
그래야 쉽게 말해 '안꼬인다' 는 건데... 정확히 머가 꼬이고 안꼬이는 지는 음...
암턴. 그 꼬이고 안꼬이고를 풀기 위해 aspnet_regiis를 이용해 재설정할 수 있다.
주의 할 점은 dotNET프레임워크가 설치되어있는 폴더에서 명령어를 쳐야 먹힌다는 점.

예를 들면 아래의 경로에서 명령어를 수행해야 한다.

C:\WINDOWS\Microsoft.NET\Framework\v1.1.4322 (1.1버전의 경우)

원래, 프레임워크 설치 후 IIS를 설치했다면, 프레임워크를 삭제 후 재설치 하면 끝.
하지만, 번거롭게 그럴 필요 없이 aspnet_regiis 를 이용해서 논리적으로 재설치하면되는거다.

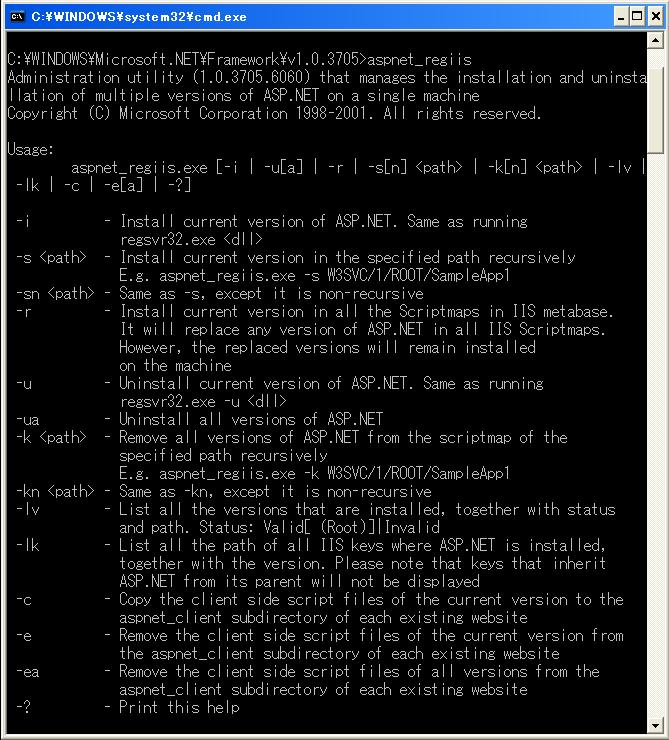
일단 aspnet_regiis 의 옵션을 보자.

사용자 삽입 이미지

aspnet_regiis


머 이중에서 필요한건 -i, -u, -lk, -lv정도.

-u 로 현재 폴더와 같은 버전의 프레임워크를 언인스톨 한다.
(-ua 를 쓰면 전체 버전이 언인스톨 된다.)

-i 로 현재 폴더 버전의 프레임워크를 인스톨 한다. 다시 말하지만, 물리적(?)이 아니다.

-lv로 설치된 모든 버전을 확인 할 수 있고,

-lk로 적용된 버전을 확인 할 수 있다.

영어공부해야지;;


Posted by miing
.NET2007. 12. 14. 13:49


//엑셀 응용프로그램 개체생성
Excel.Application xls = new Excel.Application();

//엑셀 워크북 개체생성.
Excel.Workbook xlsWorkbook;

//엑셀 워크시트 개체생성.
Excel.Worksheet xlsWorksheet;

//엑셀화면을 표시(확인을 위해)
xls.Visible = true;

//엑셀 응용프로그램 개체를 이용, 새 워크북을 추가.
objExcelWorkbook = objExcel.Workbooks.Add(Type.Missing);

// 추가된 워크북 개체를 이용, 새 워크시트 를 추가
// 타입 캐스팅 필요
xlsWorksheet = (Excel.Worksheet)xlsWorkbook.Worksheets.Add(Type.Missing, Type.Missing, Type.Missing, Type.Missing);

// 워크시트가 추가된 워크북을 지정된 경로에 저장.
// 경로 앞에
@
주의
// Excel.XlSaveAsAccessMode.xlNoChange 는 그대로 입력.
xlsWorkbook.SaveAs(@"c:\true.xls", Type.Missing, Type.Missing , Type.Missing, Type.Missing, Type.Missing, Excel.XlSaveAsAccessMode.xlNoChange
 , Type.Missing, Type.Missing, Type.Missing, Type.Missing, Type.Missing);

//워크북 Close
xlsWorkbook.Close(false, Type.Missing, Type.Missing);

Posted by miing
.NET2007. 12. 7. 17:05


HOWTO: Visual C# .NET에서 기본 파일 입/출력 수행

적용 대상

이 문서는 이전에 다음 ID로 출판되었음: KR304430

요약

본 문서에서는 Visual C# .NET을 사용하여 여섯 가지의 기본 파일 입/출력(I/O) 작업을 수행하는 방법에 대해 단계별로 설명합니다. .NET을 처음 사용하더라도 .NET에서 파일 작업을 하는 데 사용되는 개체 모델이 대부분의 Visual Studio 6.0 개발자에게 친숙한 FileSystemObject(FSO)와 매우 유사하다는 것을 알 수 있습니다. 사용자의 이해를 돕기 위해, 본 문서에 설명된 기능은 Microsoft 기술 자료의 다음 문서를 기초로 합니다.
  • 186118 HOWTO: Use FileSystemObject with Visual Basic
.NET에서도 FileSystemObject를 계속 사용할 수 있습니다. FileSystemObject가 구성 요소 개체 모델(COM) 구성 요소이기 때문에 .NET에서는 Interop 계층을 통해 이 개체에 액세스해야 합니다. 사용자가 이 구성 요소를 사용하려고 하면 .NET이 이 구성 요소에 대한 래퍼(wrapper)를 생성합니다. 하지만 .NET Framework의 File, FileInfo, Directory, DirectoryInfo 및 기타 관련 클래스는 FSO에서 사용할 수 없는 기능을 제공하므로 Interop 계층의 오버헤드가 없습니다.

맨 위로

요구 사항

다음은 권장되는 하드웨어, 소프트웨어, 네트워크 인프라 및 필요한 서비스 팩 목록입니다.
  • Microsoft Windows 2000 Professional, Windows 2000 Server, Windows 2000 Advanced Server 또는 Windows NT 4.0 Server
  • Microsoft Visual Studio .NET
  • Microsoft Visual Studio .NET Software Development Kit(SDK) Quickstarts
맨 위로

파일 입/출력 작업 예제

본 문서에 수록된 예제는 기본 파일 입/출력(I/O) 작업에 대해 설명합니다. "단계별 예제" 절에서는 아래의 여섯 가지 파일 입/출력 작업을 보여주는 예제 응용 프로그램을 만드는 방법에 대해 설명합니다.
  • 텍스트 파일 읽기
  • 텍스트 파일 쓰기
  • 파일 정보 보기
  • 디스크 드라이브 나열
  • 폴더 나열
  • 파일 나열
참고 : 다음 코드 예제를 직접 사용하려면 다음 사항에 주의하십시오.
  • 아래와 같이 System.IO 네임스페이스를 포함시켜야 합니다.
    using System.IO;
  • 아래와 같이 winDir 변수를 선언해야 합니다.
    string    winDir=System.Environment.GetEnvironmentVariable("windir");
  • 아래와 같이 addListItem 함수를 선언해야 합니다.
    private void addListItem(string value)
    {
    	this.listbox1.Items.Add(value);
    }
    참고: addListItem 함수를 선언하여 사용하는 방법 대신 다음 코드 문을 직접 사용할 수 있습니다.
    this.listbox1.Items.Add(value);"
맨 위로

텍스트 파일 읽기

다음 코드 예제에서는 StreamReader 클래스를 사용하여 System.ini 파일을 읽습니다. 파일 내용은 ListBox 컨트롤에 추가됩니다. try...catch 블록은 파일이 비어 있을 경우 프로그램에 경고 메시지를 나타내는 데 사용됩니다. 파일의 끝에 도달했을 때 이를 확인하는 방법에는 여러 가지가 있지만, 이 예제에서는 Peek 메서드를 사용하여 읽기 전에 다음 줄을 검사합니다.
    StreamReader reader=new  StreamReader(winDir + "\\system.ini");
        try   
        {    
            do
            {
                addListItem(reader.ReadLine());
            }   
            while(reader.Peek() != -1);
        }      
         
        catch 
        { 
            addListItem("File is empty");}

        finally
        {
            reader.Close();
        }
맨 위로

텍스트 파일 쓰기

이 코드 예제에서는 StreamWriter 클래스를 사용하여 파일을 만들고 파일에 쓰는 작업을 합니다. 기존의 파일도 같은 방법으로 열 수 있습니다.
    StreamWriter writer = new StreamWriter("c:\\KBTest.txt");
    writer.WriteLine("File created using StreamWriter class.");
    writer.Close();
    this.listbox1.Items.Clear();
    addListItem("File Written to C:\\KBTest.txt");
맨 위로

파일 정보 보기

이 코드 예제에서는 FileInfo 개체를 사용하여 파일 속성에 액세스합니다. 이 예제에서는 Notepad.exe가 사용됩니다. 파일 속성은 ListBox 컨트롤에 표시됩니다.
    FileInfo FileProps  =new FileInfo(winDir + "\\notepad.exe");
    addListItem("File Name = " + FileProps.FullName);
    addListItem("Creation Time = " + FileProps.CreationTime);
    addListItem("Last Access Time = " + FileProps.LastAccessTime);
    addListItem("Last Write TIme = " + FileProps.LastWriteTime);
    addListItem("Size = " + FileProps.Length);
    FileProps = null;
맨 위로

디스크 드라이브 나열

이 코드 예제에서는 DirectoryDrive 클래스를 사용하여 시스템의 논리 드라이브를 나열합니다. 이 예제에서 결과는 ListBox 컨트롤에 표시됩니다.
    string[]drives = Directory.GetLogicalDrives();
    foreach(string drive in drives)
    {
        addListItem(drive);
    }
맨 위로

하위 폴더 나열

이 코드 예제에서는 Directory 클래스의 GetDirectories 메서드를 사용하여 폴더 목록을 나열합니다.
    string[] dirs = Directory.GetDirectories(winDir);
    foreach(string dir in dirs)
        {
            addListItem(dir);
        }
맨 위로

파일 나열

이 코드 예제에서는 Directory 클래스의 GetFiles 메서드를 사용하여 파일 목록을 나열합니다.
    string[] files= Directory.GetFiles(winDir);
    foreach (string i in files)
    {
        addListItem(i);
    }
사용자가 파일에 액세스할 때는 여러 가지 예외가 발생할 수 있습니다. 파일이 없거나 파일이 이미 사용되고 있거나 액세스하려는 폴더의 파일에 대한 사용 권한이 없을 수 있습니다. 코드를 작성할 때는 이러한 가능성을 충분히 고려해서 생성되는 예외를 처리해야 합니다.

맨 위로

단계별 예제

  1. Visual C# .NET에서 새로운 Windows 응용 프로그램을 시작합니다. 기본적으로 Form1이 생성됩니다.
  2. Form1 코드 창을 엽니다.
  3. 코드 숨김 편집기에서 코드를 모두 삭제합니다.
  4. 코드 숨김 편집기 창에 다음 코드를 붙여넣습니다.
    using System;
    using System.Drawing;
    using System.Collections;
    using System.ComponentModel;
    using System.Windows.Forms;
    using System.Data;
    using System.IO;
    
    namespace fso_cs
    {
       
       /// <summary>
       /// Summary description for Form1.
       /// </summary>
       public class Form1 : System.Windows.Forms.Form
       {
          private System.Windows.Forms.Button button1;
          private System.Windows.Forms.Button button2;
          private System.Windows.Forms.Button button3;
          private System.Windows.Forms.Button button4;
          private System.Windows.Forms.Button button5;
          private System.Windows.Forms.Button button6;
          string    winDir=System.Environment.GetEnvironmentVariable("windir");
          private System.Windows.Forms.ListBox listbox1;
          /// <summary>
          /// Required designer variable.
          /// </summary>
          private System.ComponentModel.Container components = null;
    
          public Form1()
          {
             // 
             // Required for Windows Form Designer support.
             // 
             InitializeComponent();
    
             // 
             // TO DO: Add any constructor code after InitializeComponent call.
             // 
          }
    
          /// <summary>
          /// Clean up any resources being used.
          /// </summary>
          protected override void Dispose( bool disposing )
          {
             if( disposing )
             {
                if (components != null) 
                {
                   components.Dispose();
                }
             }
             base.Dispose( disposing );
          }
    
          #region Windows Form Designer generated code
          /// <summary>
          /// Required method for Designer support - do not modify
          /// the contents of this method with the code editor.
          /// </summary>
          private void InitializeComponent()
          {
             this.button1 = new System.Windows.Forms.Button();
             this.button2 = new System.Windows.Forms.Button();
             this.button3 = new System.Windows.Forms.Button();
             this.listbox1 = new System.Windows.Forms.ListBox();
             this.button4 = new System.Windows.Forms.Button();
             this.button5 = new System.Windows.Forms.Button();
             this.button6 = new System.Windows.Forms.Button();
             this.SuspendLayout();
             // 
             // button1
             // 
             this.button1.Location = new System.Drawing.Point(216, 32);
    
             this.button1.Name = "button1";
             this.button1.Size = new System.Drawing.Size(112, 23);
             this.button1.TabIndex = 1;
             this.button1.Text = "button1";
             this.button1.Click += new System.EventHandler(this.button1_Click);
             // 
             // button2
             // 
             this.button2.Location = new System.Drawing.Point(216, 64);
             this.button2.Name = "button2";
             this.button2.Size = new System.Drawing.Size(112, 23);
             this.button2.TabIndex = 2;
             this.button2.Text = "button2";
             this.button2.Click += new System.EventHandler(this.button2_Click);
             // 
             // button3
             // 
             this.button3.Location = new System.Drawing.Point(216, 96);
             this.button3.Name = "button3";
             this.button3.Size = new System.Drawing.Size(112, 23);
             this.button3.TabIndex = 3;
             this.button3.Text = "button3";
             this.button3.Click += new System.EventHandler(this.button3_Click);
             // 
             // listbox1
             // 
             this.listbox1.Location = new System.Drawing.Point(24, 24);
             this.listbox1.Name = "listbox1";
             this.listbox1.Size = new System.Drawing.Size(176, 199);
             this.listbox1.TabIndex = 0;
             // 
             // button4
             // 
             this.button4.Location = new System.Drawing.Point(216, 128);
             this.button4.Name = "button4";
             this.button4.Size = new System.Drawing.Size(112, 23);
             this.button4.TabIndex = 4;
             this.button4.Text = "button4";
             this.button4.Click += new System.EventHandler(this.button4_Click);
             // 
             // button5
             // 
             this.button5.Location = new System.Drawing.Point(216, 160);
             this.button5.Name = "button5";
             this.button5.Size = new System.Drawing.Size(112, 23);
             this.button5.TabIndex = 5;
             this.button5.Text = "button5";
             this.button5.Click += new System.EventHandler(this.button5_Click);
             // 
             // button6
             // 
             this.button6.Location = new System.Drawing.Point(216, 192);
             this.button6.Name = "button6";
             this.button6.Size = new System.Drawing.Size(112, 23);
             this.button6.TabIndex = 6;
             this.button6.Text = "button6";
             this.button6.Click += new System.EventHandler(this.button6_Click);
             // 
             // Form1
             // 
             this.AutoScaleBaseSize = new System.Drawing.Size(5, 13);
             this.ClientSize = new System.Drawing.Size(360, 273);
             this.Controls.AddRange(new System.Windows.Forms.Control[] {
                                                            this.button6,
                                                            this.button5,
                                                            this.button4,
                                                            this.button3,
                                                            this.button2,
                                                            this.button1,
                                                            this.listbox1});
             this.Name = "Form1";
             this.Text = "Form1";
             this.Load += new System.EventHandler(this.Form1_Load);
             this.ResumeLayout(false);
    
          }
          #endregion
    
          /// <summary>
          /// The main entry point for the application.
          /// </summary>
          [STAThread]
          static void Main() 
          {
          
             Application.Run(new Form1());
          }
    
          private void button6_Click(object sender, System.EventArgs e)
          {
             //How to obtain list of files (example uses Windows folder).
             this.listbox1.Items.Clear();
             string[] files= Directory.GetFiles(winDir);
             foreach (string i in files)
             {
                addListItem(i);
             }
          }
    
          private void button1_Click(object sender, System.EventArgs e)
          {
             //How to read a text file.
             //try...catch is to deal with a 0 byte file.
             this.listbox1.Items.Clear();
             StreamReader reader=new  StreamReader(winDir + "\\system.ini");
             try   
             {    
                do
                {
                   addListItem(reader.ReadLine());
                }   
                while(reader.Peek() != -1);
             }      
             
             catch 
             { 
                addListItem("File is empty");}
    
             finally
             {
                reader.Close();}
            
    
          }
    
          private void Form1_Load(object sender, System.EventArgs e)
          {
             this.button1.Text = "Read Text File";
             this.button2.Text = "Write Text File";
             this.button3.Text = "View File Information";
             this.button4.Text = "List Drives";
             this.button5.Text = "List Subfolders";
             this.button6.Text = "List Files";
          }
    
          private void button5_Click(object sender, System.EventArgs e)
          {         
             //How to get a list of folders (example uses Windows folder). 
             this.listbox1.Items.Clear();
             string[] dirs = Directory.GetDirectories(winDir);
             foreach(string dir in dirs)
             {
                addListItem(dir);
                                                          
             }
          }
    
          private void button4_Click(object sender, System.EventArgs e)
          {
             //Demonstrates how to obtain a list of disk drives.
             this.listbox1.Items.Clear();
             string[]drives = Directory.GetLogicalDrives();
             foreach(string drive in drives)
             {
                addListItem(drive);
             }
          }
    
          private void button3_Click(object sender, System.EventArgs e)
          {   
             //How to retrieve file properties (example uses Notepad.exe).
             this.listbox1.Items.Clear();
             FileInfo FileProps  =new FileInfo(winDir + "\\notepad.exe");
             addListItem("File Name = " + FileProps.FullName);
             addListItem("Creation Time = " + FileProps.CreationTime);
             addListItem("Last Access Time = " + FileProps.LastAccessTime);
             addListItem("Last Write TIme = " + FileProps.LastWriteTime);
             addListItem("Size = " + FileProps.Length);
             FileProps = null;
          }
          
          private void addListItem(string value)
          {
             this.listbox1.Items.Add(value);
          }
    
          private void button2_Click(object sender, System.EventArgs e)
          {
          //Demonstrates how to create and write to a text file.
            StreamWriter writer = new StreamWriter("c:\\KBTest.txt");
            writer.WriteLine("File created using StreamWriter class.");
            writer.Close();
            this.listbox1.Items.Clear();
            addListItem("File Written to C:\\KBTest.txt");
          }
        }
    }
    
  5. F5 키를 눌러 응용 프로그램을 빌드하고 실행합니다. 단추를 눌러 다른 동작들을 살펴봅니다. 예제 코드를 볼 때는 "Windows Form 디자이너가 생성한 코드"라는 영역을 "축소"하여 이 코드를 숨길 수 있습니다.
Posted by miing
.NET2007. 11. 20. 10:46

알럽붸붸 스카이

//참조추가(COM)
// Microsoft Excel 11.0 Object Library
// Microsoft Office 11.0 Object Library

//참조추가(.NET)
// Microsoft.Office.Tools.Excel
// Microsoft.VisualStudio.Tools.Applications.Runtime
/**  엑셀 설정 **/
using Excel = Microsoft.Office.Interop.Excel;
using Office = Microsoft.Office.Core;
using System.Runtime.InteropServices;

private void TestExcel()
{
            Excel.ApplicationClass app = new Excel.ApplicationClass();
}


- 개발자 커뮤니티 사이트 (http://www.sky.ph) -
Posted by miing